Milky Way Frosting ~ Recipe


This cake right here! This is one of my favorite cakes. So much chocolate!!!
I first tried this cake in Mexico a few years ago and I fell in love with it. The key to this cake is the frosting; it has a delicious layer of cream cheese frosting and a layer of milky way frosting. It is absolutely divine.
After I moved to the US, I knew I had to figure out how to make this frosting because I needed to have some of this awesome cake. I finally found a very basic recipe for it that only had ingredients but didn't have the directions on how to make it. At first, my frosting was all melted and wouldn't even stay on the cake! The taste was spot on, but the consistency was off. So after a bit of trial and error I found out how to get the right consistency.

The cake itself is a basic chocolate cake. I've used this frosting with chocolate cake from scratch, a doctored box mix and even just a mix straight from the box. Use any chocolate cake recipe you like best! I like to use a bundt cake pan because this recipe is just the right amount to cover it. 

There are two different parts to this frosting,

Cream Cheese Frosting:
1/2 can of condensed milk
1 cream cheese bar, softened (8 oz)

Directions:
Place the condensed milk and the cream cheese in a bowl and mix on medium until smooth.
Cover and place in the refrigerator for at least 30 minutes.

Milky Way Frosting:
1 unsalted butter stick
2 regular size Milky Way bars
1/2 can of condensed milk
2 tablespoons of Natural Cocoa

Directions:
Place butter and milky way bars in a microwave safe bowl and melt in 30 second intervals.
Add the condensed milk and the cocoa and mix on medium speed until smooth (it will have a few specs of nougat)
Cover and place in the refrigerator.
When you are ready to use it, remove from the refrigerator and let it stand for a few minutes on the counter top to come to room temperature.


Putting it all together:

Once the cake is completely cool, frost it using the cream cheese mixture first, then, frost it with the milky way mixture. Use a spatula to mix them just enough to see both colors.
Decorate with pieces of Milky Way candy bars or chopped pecans!

Enjoy!

Notes: keep the covered cake in the refrigerator to prevent the cream cheese from going bad, but let it sit to room temperature for a little while before serving.


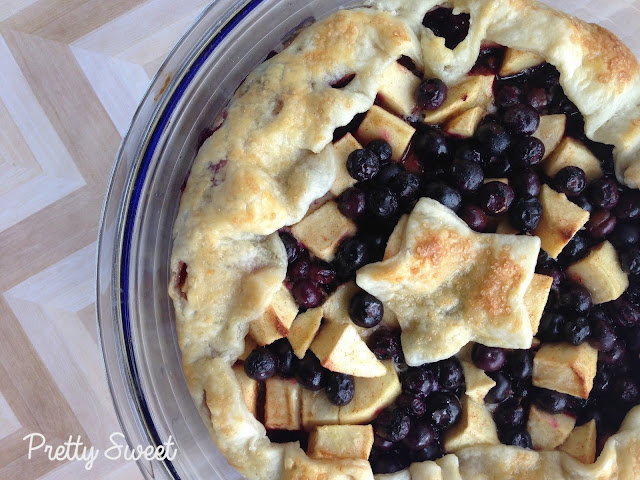
Blueberry Apple Pie Recipe


I got this recipe watching a cooking TV show, but it was years ago and can't remember which show was it or who's recipe it is. But as I watched how easy this was I knew I had to give it a try, and I'm so glad I did! I've made this several times and the more I make it, the more I fall in love with it. 

Blueberry Apple Pie Recipe

 To be honest, I've always been a bit intimidated by pies. I'm always afraid of messing them up, so I tend to stay away from making them. But this pie in particular is so easy to prepare and you really can't go wrong with it. Another plus, is that you don't need to do a fancy design for the crust. I put a star in the middle because tomorrow is 4th of July and what better way to celebrate than with a slice of pie!

Blueberry Apple Pie Recipe

This pie is not overly sweet, I love that the blueberries give it a nice tart taste and it really balances the sweetness. So go ahead and eat a couple of slices! You won't feel bad. 
And I think it tastes better when it's warm, so if you have leftovers, it's better to reheat it a little bit. 

Blueberry Apple Pie Recipe

INGREDIENTS:

CRUST
1 1/4 cups flour, plus extra for dusting
Pinch of salt
1 stick butter, cut into small cubes and frozen
1/4 cup ice water

FILLING
16 ounces fresh blueberries
2 Golden Delicious apples, cored, peeled and cut into 1/2-inch dice
1/2 cup sugar
1/4 cup cornstarch
1/2 teaspoon ground cinnamon
2 teaspoons fresh lemon juice
Pinch of salt
2 tablespoons butter, cut into small cubes
1 egg
2 tablespoons turbinado sugar

SPECIAL EQUIPMENT: food processor, 9-inch pie pan

DIRECTIONS:

Preheat the oven to 400 degrees F.

For the crust: In a food processor, add the flour and a nice pinch of salt. Pulse very lightly just to blend. Add the butter evenly around the flour and quickly pulse until the flour resembles small crumbles. Slowly pour the water through the spout until the dough begins to come together. Remove and quickly form into a disc. Tightly cover with plastic wrap. Refrigerate for 20 minutes.

Meanwhile, for the filling: In a large bowl, add the blueberries, apples, sugar, cornstarch, cinnamon, lemon juice and a pinch of salt. Stir to combine and set aside.

Remove the dough from the refrigerator and place on a lightly floured surface. Gently roll the disc into a circle big enough to fit into the pie pan and leave a 3-inch overhang. The dough should be about 1/8-inch thick. Using a pizza cutter, trim the edges of the dough. Place the dough into the pie pan and press gently against the bottom and sides to fit the dough into the pan. Pour in the fruit filling, and then scatter the butter evenly around the top of the pie. Fold the extra dough that's hanging off the edge over the top to create the top of the pie crust. Leave a hole in the center for ventilation.

Whisk the egg with 1 teaspoon water and brush the top with egg wash and then sprinkle with the turbinado sugar.

Place in the oven and bake until the crust is golden brown, about 35 minutes. Let the pie rest at least an hour before serving to let the filling set.


Mini Biscotti Recipe

My husband is not a big fan of sweets, he prefers to drink his coffee and maybe a couple of cookies on the side. This year for Father's Day I really wanted to make him some cupcakes, but I quickly realized that I would probably be eating the cupcakes by myself and wouldn't be much of a present for him. So I decided to make him biscotti. 

A classic biscotti is made with almond or amaretto extract, but that's not something I usually keep at hand, and the beauty of biscotti is that you can play with the ingredients and find what you like. I made this recipe using vanilla extract and I added walnuts to only half of the recipe to make plain biscotti as well. You can play with it and use any type of nut you like or change the extract for a totally different flavor. 


INGREDIENTS:

2 cups of flour, plus extra for dusting.
2/3 cup of sugar
1 teaspoon of baking powder
3 eggs
2 teaspoons of vanilla extract
1/4 to 1/2 cup of walnuts (optional) 
 
Makes about 28 mini biscotti
DIRECTIONS:

Position rack in the center of the oven and preheat to 350 degrees. Line a large baking sheet with parchment paper. 
 
Place walnuts in a single layer on a baking sheet and toast in the oven for 8 to 10 minutes, or until just golden and aromatic. Remove and set aside. 
 
In a large bowl, mix flour, sugar and baking powder. In a small bowl, whisk eggs and vanilla extract until well blended. Add to the flour mixture. Work the batter with floured hands. It will be sticky but keep working it until it forms a dough.
 
 
Next, you can either add 1/2 cup of walnuts to the dough or separate the dough into two equal parts and add  1/4 cup of walnuts to only one piece of dough. I decided to make one part plain and one part with walnuts. 
 
On a floured surface, place one piece of dough and using your hands, roll into a log shape that is approximately 10 inches long and 2 1/2 inches wide. If it's sticky, simply dust your palms with more flour. Repeat with remaining piece of dough. Place two logs on a baking sheet.
 
Bake at 350 degrees for 35 minutes, turning the pan around halfway through, or until the tops of the loaves are deep golden. Cool on a rack for about 20 minutes before slicing. Place a loaf on a cutting board. Using a large serrated knife, cut 3/4-inch-thick slices, either straight or on the diagonal. Use a sawing motion to prevent crumbling. Each loaf should yield 12-14 cookies. If the cookie is crumbling, then let it cool a few more minutes. Don't let it rest too long, however, or it could become too hard to slice.
 
Place slices on their sides back on to the baking sheets. Reduce oven temperature to 200 degrees, and bake biscotti for 30 minutes, until toasted and crisp. If you desire, you can turn off the oven and let the biscotti stay for up to an hour. The longer they stay in the oven, the harder they will become. Remove from oven and cool completely before storing in an airtight container, preferably a tin, which helps keep them crisp. Stored properly, biscotti will last up to a month.
 
 
Recipe adapted from : npr.org

Classic Fruit Tart Recipe


This past weekend we had my in-laws in town, they are from up north and we don't get to see each other as often as we would like. Our girls were so happy to see their grandparents and we had an amazing time just hanging out with them. It was also my mother in law's birthday and I really wanted to make her something sweet to celebrate. I thought a fruit tart would be perfect, just sweet enough, but not too sweet, and a refreshing cold treat for this weird warm and rainy weather.

When I first wanted to learn how to make it, I was very intimidated about it. I thought it would be very difficult and technical to make. And even though it is time consuming, it is actually not difficult to make at all. I really hope you give this recipe a try and enjoy this awesome dessert.

Fruit Tart Recipe

Source: America's Test Kitchen
Makes one 9- to 9 1/2-inch tart

PASTRY CREAM
2 cups half-and-half

1/2 cup granulated sugar
Pinch table salt

5 large egg yolks, chalazae removed (see note)
3  tablespoons cornstarch
4  tablespoons unsalted butter (cold), cut into 4 pieces
1 1/2 teaspoons vanilla extract

TART PASTRY
1 large egg yolk
1 tablespoon heavy cream

1/2 teaspoon vanilla extract

1 1/4 cups unbleached all-purpose flour (6 1/4 ounces)

2/3 cup confectioners' sugar (about 3 ounces)

1/4 teaspoon table salt

1 stick unsalted butter, very cold, cut into 1/2-inch cubes

FRUIT AND GLAZE
Fruit, unwashed

1/2 cup red currant jelly or apple jelly

Fruit Tart Recipe

PASTRY CREAM
Heat half-and-half, 6 tablespoons sugar, and salt in medium heavy-bottomed saucepan over medium heat until simmering, stirring occasionally to dissolve sugar.

Meanwhile, whisk egg yolks in medium bowl until thoroughly combined. Whisk in remaining 2 tablespoons sugar and whisk until sugar has begun to dissolve and mixture is creamy, about 15 seconds. Whisk in cornstarch until combined and mixture is pale yellow and thick, about 30 seconds.

When half-and-half mixture reaches full simmer, gradually whisk simmering half-and-half into yolk mixture to temper. Return mixture to saucepan, scraping bowl with rubber spatula; return to simmer over medium heat, whisking constantly, until 3 or 4 bubbles burst on surface and mixture is thickened and glossy, about 30 seconds. 

Off heat, whisk in butter and vanilla. Transfer mixture to medium bowl, press plastic wrap directly on surface, and refrigerate until cold and set, at least 3 hours or up to 48 hours.

TART PASTRY
While pastry cream is chilling, whisk together yolk, cream, and vanilla in small bowl; set aside. Pulse to combine flour, sugar, and salt in bowl of food processor fitted with steel blade. Scatter butter pieces over flour mixture; pulse to cut butter into flour until mixture resembles coarse meal, about fifteen 1-second pulses. 

With machine running, add egg mixture and process until dough just comes together, about 25 seconds. Turn dough onto sheet of plastic wrap and press into 6-inch disk. Wrap in plastic and refrigerate at least 1 hour or up to 48 hours.

Remove dough from refrigerator (if refrigerated longer than 1 hour, let stand at room temperature until malleable). Unwrap and roll out between lightly floured large sheets of parchment paper or plastic wrap to 13-inch round. (If dough is soft and sticky, slip onto baking sheet and refrigerate until workable, 20 to 30 minutes.) 

Transfer dough to tart pan by rolling dough loosely around rolling pin and unrolling over 9- to 9 1/2-inch tart pan with removable bottom. Working around circumference of pan, ease dough into pan corners by gently lifting dough with one hand while pressing dough into corners with other hand. Press dough into fluted sides of pan. (If some edges are too thin, reinforce sides by folding excess dough back on itself.) Run rolling pin over top of tart pan to remove excess dough. Set dough-lined tart pan on large plate and freeze 30 minutes (can be sealed in gallon-sized zipper-lock plastic bag and frozen up to 1 month).

Meanwhile, adjust oven rack to middle position and heat oven to 375 degrees. Set dough-lined tart pan on baking sheet, press 12-inch square of foil inside frozen tart shell and over edges and fill with metal or ceramic pie weights (see note). Bake until golden brown, about 30 minutes, rotating halfway through baking time. Remove from oven and carefully remove foil and weights by gathering edges of foil and pulling up and out. Continue to bake until deep golden brown, 5 to 8 minutes longer. Set baking sheet with tart shell on wire rack to cool to room temperature, about 30 minutes.

TO ASSEMBLE AND GLAZE
When tart shell is completely cool, spread cold pastry cream over bottom, using offset spatula or large spoon. Arrange fruit on top of pastry cream.

Bring jelly to boil in small saucepan over medium-high heat, stirring occasionally to smooth out lumps. When boiling and completely melted, apply by dabbing and flicking onto fruit with pastry brush; add 1 teaspoon water and return jelly to boil if it becomes too thick to drizzle. 

Remove outer metal ring of tart pan, slide thin metal spatula between bottom of crust and tart pan bottom to release, then slip tart onto cardboard round or serving platter; serve.

NOTES:
     -The chalazae are the little white strings that are attached to the egg yolk. You can easily remove it with your fingers.
     -You don't need to buy pie weights. You can just use either uncooked beans or rice as substitute. I prefer using rice. 
     -You can make the pastry cream a day or two in advance and just fill the tart once you are ready to serve.

Fruit Tart Recipe


Raspberry Swirl Meringues

Yesterday, I received the wonderful news that I had won the First Prize for the Springtime in Paris Contest by Michael's Stores, a $1,000 Michael's gift card! When I first saw the email I just could not believe it, I had to read it a couple of times and kind of checked to make sure it wasn't a scam LOL
Once I was convinced that what I was reading was real I immediately told my husband and we were both stunned!
The Grand Prize was a trip to Paris with exclusive tours and classes, the First Prize was a Michale's $1,000 gift card and the Second Prize, a $500 gift card.

I am so thankful and happy! From what I read, around 11,000 entries were judge, and there where so many beautiful projects. You can hop over to Michael's Blog to see the other winners.
Here is a link to my post about the cookies I submitted ~ Paris Themed Cookies


And what better way to celebrate than with a sweet treat! For some time now, I have been wanting to experiment with more confections other than just cakes and cookies, and meringue cookies seemed a good way to start. Meringue cookies are absolutely delicious, they are crisp on the outside with a light and fluffy (not chewy!) inside. If you are looking to bake something that doesn't require many ingredients, meringues are perfect for you.


Meringues are basically just beaten egg whites and sugar, cream of tartar is added to stabilize the egg whites and to help them gain volume.

Most recipes call for super fine or caster sugar, but I don't easily find it in my local grocery store, so I decided to follow a recipe which calls for half granulated sugar, half powdered sugar and it turned out great!

INGRDIENTS:
 
2 egg whites (room temperature)
2 tbsp. seedless red raspberry jam (room temperature) 
1/8 tsp. cream of tartar
1/3 cup granulated sugar
1/3 cup sifted powdered sugar
 
DIRECTIONS:

Let egg whites stand, covered, in a large stainless-steel or glass mixing bowl at room temperature for 30 minutes. Meanwhile cover 2 large baking sheets with parchment paper. 
Preheat oven to 300 degree F. 
In a small bowl, combine the superfine sugar and sifted powdered sugar; set aside. Uncover eggs and add cream of tartar. Beat with an electric mixer on medium speed until soft peaks form.   


Add sugar mixture, 1 tablespoon at a time, beating for 5 to 7 minutes on medium speed or until stiff glossy peaks form and sugar is dissolved. The sugar has completely dissolved once you can rub the mixture between your fingers and you feel no sugar granules anymore.  


Spoon mounds of the mixture on to the baking sheets, or you can use a pastry bag if you want a more uniform look.  
Drizzle a small amount of jam on the meringue cookies and using a toothpick, swirl the jam. 


Place baking sheets in preheated oven. Turn off oven. Let meringues dry in oven, with door closed, for at least 2 hours or until dry and crisp. Let cool on parchment paper. Gently remove meringues. 


Tips:
~ If you can't find seedless jam, don't worry! You can use a mesh strainer to remove the seeds.
~ Keep in mind that the jam swirl will remain a bit sticky, so if you would like to package them, I would recommend to gently fold 1/2 cup of the meringue mixture into the jam; then gently fold jam mixture into the remaining meringue. 
~You can add gel food coloring to give them a stronger color. 

~If you don't have a stand mixer, you can definitely try making it with a hand mixer. I have in the past and it is possible, you will just have to mix for a longer time

You can use this recipe and substitute the rasberry jam for any other ingredient to customize their flavor, like chocolate ganache, any type of fruit jam, caramel sauce, nutella, the options are endless!
Enjoy!!

Recipe adapted from BHG

Hand Painted Cookies ~ Tulip Bouquet

This week a dear friend of mine celebrated her 30th birthday and I was excited to make her a treat, so I thought of making her a pretty cookie bouquet of flowers! I used a mason jar cookie cutter and an egg cookie cutter for the flowers. I didn't want to use the basic tulip cutter because I thought it would be neat if the tulips looked more realistic and the egg cutter gave me more room to play with the petals. The leaves were cut by hand using a knife. I hand painted all the cookies using gel colors. 

I think they turned out great! And my sweet friend loved her bouquet.
Have you given painted cookies a try yet?


Easter Cookies and Working with Colors

This Easter I really wanted to create cookies for some sweet new friends at church to enjoy. Plus I had a couple of new cookie cutters that I really wanted to try too!

When trying to figure out designs and colors for my cookies, something I find useful is to pick three to four different colors and to let them carry themselves through out all the cookies.
When I first started decorating cookies (not long ago) I used start with a clean bowl for every single color. And even though the colors looked good, once I used them all together in the set of cookies, they seemed a little off. Like they just didn't match. So I thought of something I normally do when doing an oil painting... I don't really clean my brush unless absolutely necessary. 
When mixing my royal icing and preparing the colors, I usually start by mixing my main color, then I use the same bowl (without cleaning all the icing off!) to start mixing a new color. This way, all the colors have a little bit of a similar tint and it really makes a big difference. Now, all the cookies will look like they belong together. 

The amazing moss technique you see in the bunny is all the rave in the cookie world and I just had to try it! Thanks to Mike from SemmiSweet for showing us how to make it. Here is a direct link to his tutorial.


Now this little guy was not part of this set of cookies, but I really wanted to try to make some sort of fur using royal icing. This was my first attempt and I think it looks pretty neat. I might have to perfect the technique a little bit more but I think I'm in the right path, what do you think?